Summer Hair Prep: Blowout Tips for Humidity That Actually Work
Share
Master humidity-proof blowouts with professional techniques that keep your style all day long
Summer is here, and with it comes the age-old battle between your perfect blowout and humid weather. You know the drill – you spend 30 minutes creating gorgeous, voluminous hair only to step outside and watch it fall flat or turn into a frizzy mess within minutes.
But what if we told you that humidity doesn't have to be your hair's worst enemy? With the right techniques, products, and tools, you can create blowouts that not only survive summer humidity but actually thrive in it.
Why Humidity Ruins Your Blowout (The Science Behind the Struggle)
Before diving into solutions, let's understand why humidity wreaks havoc on styled hair. Hair is naturally porous, and when there's moisture in the air, your hair cuticles open up to absorb that moisture. This causes:
- Frizz formation as hair swells unevenly
- Loss of volume when moisture weighs down your style
- Curl pattern changes in naturally wavy or curly hair
- Shortened style lifespan requiring frequent touch-ups
Understanding this process is the first step to beating it.
The Pre-Blowout Game Plan: Setting Yourself Up for Success
1. Start with the Right Shampoo and Conditioner
Choose humidity-blocking formulas that create a protective barrier around your hair shaft. Look for products containing:
- Silicones (cyclopentasiloxane, dimethicone)
- Keratin proteins
- Anti-humidity polymers
Pro tip: Use a clarifying shampoo once a week to remove product buildup that can make hair more susceptible to humidity.
2. Apply Heat Protectant Like Your Hair's Life Depends on It
Never skip this step, especially in summer. Heat protectants don't just shield from thermal damage – they also create a moisture barrier that helps repel humidity.
Application technique:
- Apply to damp (not soaking) hair
- Work through from mid-length to ends
- Use a wide-tooth comb to distribute evenly
3. The Power of Pre-Styling Products
Anti-humidity serums should be your summer best friend. Apply a small amount to damp hair before blow drying. These products work by:
- Filling in hair cuticles
- Creating an invisible shield
- Smoothing the hair shaft
Professional Blowout Techniques for Humid Weather
The Section Strategy That Changes Everything
Here's where most people go wrong: they rush through sectioning or skip it entirely. In humid weather, proper sectioning is non-negotiable.
The humidity-proof sectioning method:
- Start with smaller sections than you normally would
- Clip sections tightly to prevent them from falling
- Work systematically from bottom to top
- Don't move to the next section until the previous one is completely dry
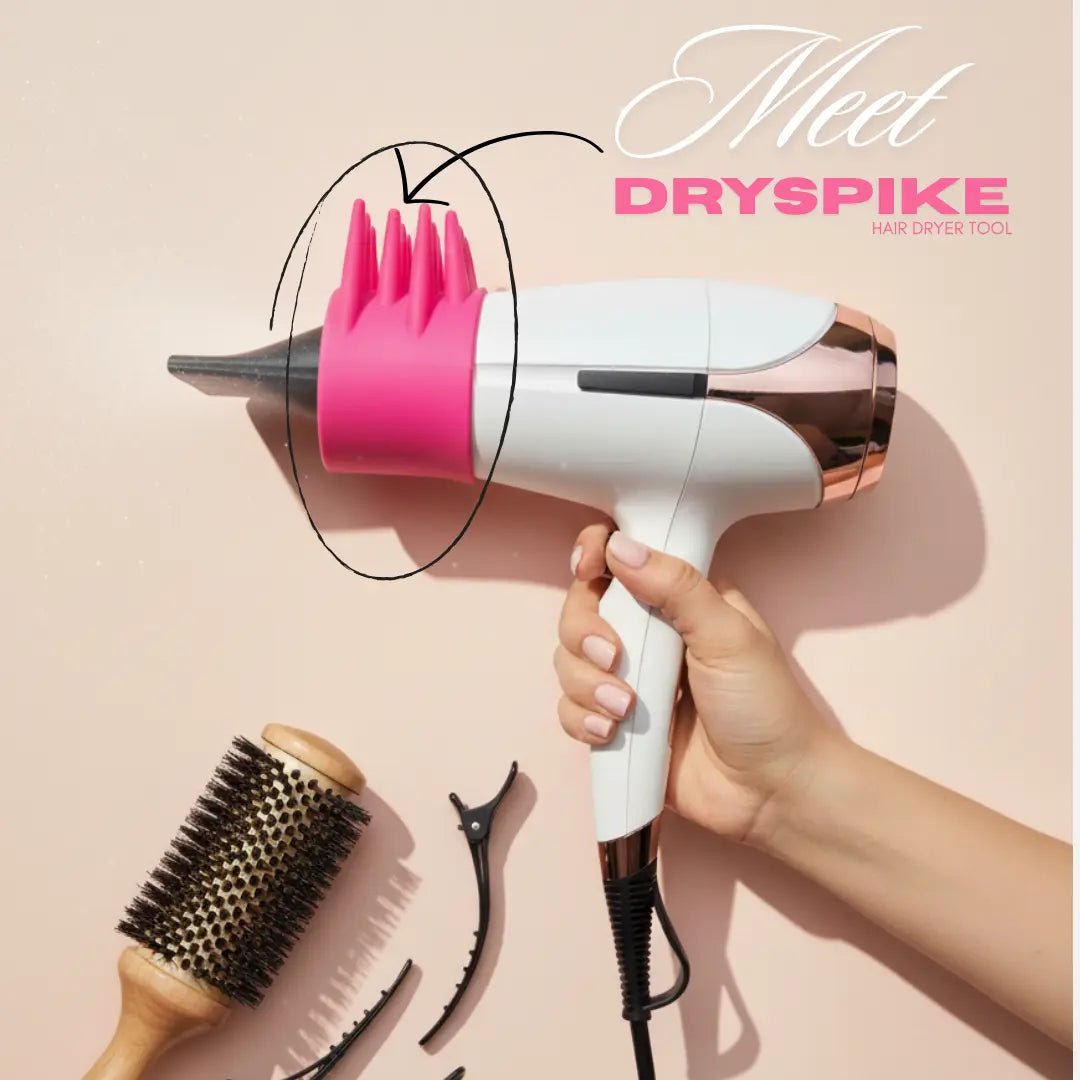
The game-changer: This is exactly why professional stylists and savvy home users are turning to tools like DrySpike. When your sections actually stay put while you style, you can focus on technique rather than fighting fallen pieces – crucial for humidity resistance.
The Cool Shot Technique (Your Secret Weapon)
Many people underestimate the power of the cool shot button, but it's essential for humidity-proof styles.
How to use it effectively:
- Blast each section with cool air for 10-15 seconds after styling
- Hold the section taut while cooling
- This sets the cuticle and locks in your style
Direction Matters: The Tension Technique
For volume that lasts:
- Pull sections up and away from your head at a 90-degree angle
- Use consistent tension throughout the drying process
- Maintain tension until hair is completely cool
For smooth styles:
- Pull sections down and slightly under
- Use a paddle brush for maximum smoothness
- Keep the dryer nozzle pointing down the hair shaft
Product Layering for Maximum Humidity Protection
The Three-Layer Defense System
Layer 1: Heat Protectant (on damp hair)
- Creates initial barrier
- Protects from thermal damage
Layer 2: Styling Product (volumizing mousse or smoothing cream)
- Provides hold and control
- Adds specific benefits (volume, smoothness)
Layer 3: Finishing Product (applied after styling)
- Seals the style
- Adds final humidity protection
Choosing the Right Finishing Products
For fine hair: Light anti-humidity sprays that won't weigh hair down For thick hair: Stronger serums or oils that can penetrate the hair shaft For curly hair: Cream-based products that define while protecting
Common Summer Blowout Mistakes (And How to Fix Them)
Mistake #1: Skipping the Primer
The fix: Always use a heat protectant with anti-humidity properties
Mistake #2: Using Too Much Product
The fix: Start with less than you think you need – you can always add more
Mistake #3: Not Drying Hair Completely
The fix: Even 5% moisture left in your hair can spell disaster in humidity
Mistake #4: Fighting Fallen Sections
The fix: Use tools that actually hold your sections in place while styling
Mistake #5: Forgetting the Roots
The fix: Ensure roots are completely dry and lifted for lasting volume
Quick Touch-Up Techniques for Humid Days
Even with perfect preparation, you might need touch-ups throughout the day. Here's how to refresh your style quickly:
The 5-Minute Refresh
- Lightly mist problem areas with water
- Apply a tiny amount of anti-humidity serum
- Re-blow dry just those sections
- Finish with cool air
The Dry Shampoo Hack
Use dry shampoo not just for oil absorption, but as a texture enhancer that helps repel moisture:
- Spray at roots for volume
- Work through mid-lengths for grip
- Creates a barrier against humidity
Advanced Techniques: Taking Your Humidity Game to the Next Level
The Wrap and Set Method
After completing your blowout:
- Wrap sections around large rollers
- Leave in for 10-15 minutes while hair cools completely
- Remove carefully and finish with anti-humidity spray
The Strategic Part Placement
Change your part slightly on humid days. Hair tends to fall flatter along your natural part, so shifting it 1/2 inch can add volume and help your style last longer.
The Temperature Control Technique
Use lower heat settings but take more time. High heat can actually make hair more porous and susceptible to humidity damage.
Tools That Make a Difference in Humid Weather
Essential Tools for Humidity-Proof Blowouts
1. Ionic Hair Dryer
- Reduces frizz by breaking down water molecules
- Cuts drying time significantly
- Creates smoother cuticles
2. Boar Bristle Brush
- Distributes natural oils evenly
- Creates ultra-smooth finish
- Adds natural shine that repels moisture
3. Section Control Tools When humidity is high, maintaining perfect sections becomes even more critical. Professional stylists know that fighting fallen sections wastes time and creates uneven results.
The DrySpike difference: Traditional clips and pins can slip in humid conditions, but having a tool that actually grips your hair dryer and holds sections securely transforms your styling process. It's like having an extra hand that never gets tired or slips.
DIY vs Professional Tools: When to Invest
While many humid-weather techniques can be mastered at home, having professional-quality tools makes a significant difference in results and longevity.
Climate-Specific Strategies
Beach/Coastal Humidity (High moisture, salt air)
- Pre-treat with leave-in conditioner to prevent salt damage
- Use stronger hold products to combat constant moisture
- Embrace beachy textures that work with the environment
City Humidity (Pollution + moisture)
- Focus on protective barriers against environmental damage
- Use clarifying treatments more frequently
- Opt for sleeker styles that show less frizz
Tropical Humidity (Extreme moisture levels)
- Consider protective styles like braids or updos
- Use the strongest anti-humidity products in your arsenal
- Plan for multiple touch-ups throughout the day
Long-Term Hair Health in Humid Climates
Weekly Deep Conditioning
Humidity can be drying over time as your hair constantly adjusts to moisture changes. Combat this with:
- Protein treatments every 2-3 weeks
- Moisture masks weekly
- Scalp treatments to maintain healthy growth
Seasonal Adjustments
Your humidity-fighting routine should evolve:
- Spring: Lighter products as humidity increases gradually
- Summer: Full humidity-fighting arsenal
- Fall: Transition products as air becomes drier
- Winter: Switch focus to static control
Troubleshooting: When Your Blowout Still Falls Flat
If Your Style Falls Within 30 Minutes:
- You likely have moisture trapped in your hair
- Solution: Use less product and ensure complete drying
If You Get Frizz Despite Anti-Humidity Products:
- Your hair cuticles may be damaged
- Solution: Focus on repair treatments and gentler styling
If Sections Keep Falling During Styling:
- Poor sectioning technique or inadequate tools
- Solution: Invest in better section control methods
If Products Feel Heavy or Greasy:
- You're using too much or the wrong formulation for your hair type
- Solution: Scale back and find lighter alternatives
Professional Secrets: What Salons Don't Tell You
The Timing Secret
Professional stylists start with completely towel-dried hair – not soaking wet. This reduces overall drying time and creates better results.
The Airflow Secret
Never blast air directly into the roots when going for volume. Instead, lift sections and direct airflow underneath for maximum lift.
The Product Secret
Salons often mix their own humidity-fighting cocktails by combining different products. Try mixing a drop of oil with your heat protectant for extra moisture barrier.
Maintenance: Making Your Blowout Last Days, Not Hours
Night Routine for Blowout Preservation
- Sleep on silk or satin pillowcases to reduce friction
- Wrap hair loosely in a silk scarf
- Use a humidifier in very dry climates to prevent overcorrection
Morning Refresh Techniques
- Shake out sections gently rather than brushing aggressively
- Use dry texture spray for instant volume revival
- Target only areas that need attention rather than redoing everything
Product Reapplication Strategy
Know when to add more product:
- Light misting of anti-humidity spray mid-day
- Tiny amounts of serum on frizzy spots only
- Dry shampoo for oil control and texture
Seasonal Transition: Preparing Your Hair for Summer
2 Weeks Before Summer:
- Start using humidity-fighting products to build up protection
- Begin weekly deep conditioning treatments
- Consider a professional cut to remove damaged ends
Summer Kickoff:
- Stock up on travel-sized products for touch-ups
- Establish your routine and stick to it consistently
- Take progress photos to track what works best
The Bottom Line: Confidence in Any Weather
Creating humidity-proof blowouts isn't about fighting against nature – it's about working with your hair's natural tendencies while using smart techniques and tools to achieve the results you want.
The key elements for success:
- Proper preparation with the right products
- Systematic sectioning and thorough drying
- Quality tools that make the process easier and more effective
- Realistic expectations and backup plans for extreme weather days
Remember, even professional stylists adapt their techniques based on weather conditions. The goal isn't perfection – it's creating styles that make you feel confident and beautiful, regardless of what the humidity levels are doing outside.
With these techniques in your arsenal, you can stop dreading humid summer days and start looking forward to showing off your gorgeous, long-lasting blowouts all season long.
Ready to Transform Your Summer Hair Game?
The difference between a blowout that falls flat in humidity and one that lasts all day often comes down to having the right techniques and tools. When you can maintain perfect section control throughout your styling process, everything else becomes easier – from achieving better volume to creating smoother finishes that resist moisture.
Don't let another summer pass by with disappointing hair days. Master these humidity-fighting techniques and discover what your hair is really capable of, even on the most challenging weather days.
Looking for more hair styling tips and techniques? Subscribe to our newsletter for weekly professional tips, seasonal guides, and exclusive styling secrets that help you achieve salon-quality results at home.